
Welcome to the Realm667 tutorial section. Here, you'll find a variety of guides catering to all skill levels. Whether you're a pro or a newbie in Doom editing, there's something here for you. If you're looking for a tutorial on a specific topic, just let us know, and we'll find or create one for you.
The screen is dark and all you hear is the crackling static of a radio receiver in its last throes. Slowly the screen brightens in a classic fade-in to reveal a scene of carnage and destruction. Suddenly, a shadow darts across the screen and the camera moves to follow it. Ominous music pipes in, softly at first, but growing to a crescendo as the camera reaches a breach in the wall. A city street stretches out below, buildings along it lying in ruins and utter devastation. The camera slowly drops to street level and pans around. You hear the sound of heavy, belabored breathing, and the camera swings in the direction of the sound. Suddenly a scream rings out, and the camera lens is splattered with drops of crimson as you hear the sound of a body hitting the pavement. The music peaks just in time to show you a vast, indistinct shape shambling away into an adjacent alley. Words and a logo zoom out onto the screen, but you are cringing at the horror of it all, and for a moment you can't make sense of the words. "ATTACK OF THE KILLER FIENDS", they announce. The scene fades to black but the title remains on the screen. You breathe a sigh of relief as you press the 'ESC' button to bring up the menu. All is safe with the world. It's only a game after all.
Anybody who's played a modern computer or console game has seen one - the ubiquitous cutscene. Used for everything, from providing a story's introduction to filling in pieces of the action that cannot be left to the player to control, cutscenes serve a myriad of purposes. As outlined by the fictitious scenario in the paragraph above, it is used as a means to set up the "back story" and to create the appropriate mood. It can be used for mission briefings, where the player can benefit from basic information about the game and its objectives. It can be used to show the player the effect of his/her actions in a distant, remote part of the game. It can be used to advance the plot, provide clues, and promote character development. Finally, it can be used to provide a dramatic conclusion when the player has successfully completed all objectives. Cutscenes are an important tool in a game-developer's kit, and when used skillfully they can create a dynamic environment in the player's sand-box.
There are two key elements in the creation of a cutscene - aesthetics and mechanics. Aesthetics are, largely, subjective and a matter of taste. Therefore, I'll only provide some basic guidelines on what this constitutes. Or, more accurately, I'll provide some guidelines on what I think it constitutes. Mechanics, on the other hand, are more easily established, and I'll provide step-by-step instructions on how to achieve some common cutscene effects.
The aesthetics aspect of a cutscene revolves around the mood you wish to create, and your desire to hold the player's interest. Here are some pointers, all of which pertain more to cinematography than map-building:
There are seven common tools you can use in a cutscene, and each of these is already built into ZDooM. As such, you won't need to insert your own resources into your game if you so choose. These tools are:
There are four steps to developing your cutscene [which I have cheesily named the "4P Method"]: Planning, Placement, Programming, Playing. Let me first outline what these steps are and their importance in creating the right effect. After that I'll illustrate with some examples.
2. Placement: Once you've planned out your scene you'll need to begin putting your "pieces on the board". The four main types of pieces are actors, cameras, interpolation points, and patrol points. Use your plan to place your various pieces into the appropriate positions. Keep in mind that you have three dimensions to work with, so make sure you take advantage of height variations, especially for your cameras. For example, during a mission briefing you can start your camera near the ceiling as it faces the principal actor. As the briefing begins the camera could slide down to a few feet above the ground before moving forward to zoom in on the actor. If there are actors that need to be moving (e.g., an enemy or a model) you'll need to position your Patrol Points and Actor Movers.
3. Programming (scripting & specials): If your "pieces" are the automobile, your scripting is the driver of the automobile. It tells the pieces when to start, when and where to move, when to turn, and when to stop. The specific lines of code you use will depend on the nature of the cutscene. In most instances you'll need to "freeze" the player so that s/he is unable to move independently and interfere with the action. Accordingly, you'll need the SetPlayerProperty function. You can "unfreeze" the player later, as appropriate. But until then you will need to begin the process of letting the dominoes fall. The first step in that process is "changing" your camera and activating it using the Thing Activate function. [Optionally, you can fade into the scene using the FadeTo function before you activate the camera.] Finally, you fade back into the scene.
So far, all you've done is changed the scene to a remote camera and activated it. Now you need to trigger the events of your cutscene. If you've set up your first camera to be a moving camera, you'll have also set up your sequence of interpolation points. This, then, becomes a "fire-and-forget" device that proceeds automatically, and does not require further manipulation. Keep in mind that setting up your interpolation points is not a trivial task; distance between points, height of points, angle the point faces, and speed between points [travel time] will all determine how smooth and dynamic your camera movement will be. If you're doing a mission briefing you'll begin displaying the heads up display (HUD) text or begin a sound recording, or both. [You can use ThingSound to start the audio portion of the briefing.] If all you're doing is a "static" mission briefing, where the briefer is stationary, beyond this point you'll simply need to change cameras as appropriate, fade out when the briefing is complete, change cameras back to the player, and unfreeze her/him.
If you are doing a more complex cutscene, such as a battle scene or a fly-by, you'll need to activate your actors in addition to your cameras. Much of the actor behavior will already have been determined in the Planning, and Placement stages of setting up your scene. To move and animate actors, you'll need to use patrol points to designate the path your actors will take. This method is ideal for enemies, non-combatant actors (e.g., scientists), and other things that have animated frames and behavior. If you just want to move an actor without animating it (e.g., a model of a tram that runs on an electrified rails and without wheels) use an actor mover. You can use this method for any type of actor, but if it's not a model the actor will be moved without any of the inherent animation that is part of its normal behavior; use the patrol point method if you need the sprite animations. If it's a model, the actor mover will move it along the path and all the associated animations will work. For example, if your actor is a model of a helicopter, and the model definition includes turning rotor blades, the helicopter will appear to move forward (or backward/upward/downward as you define) while its blades rotate. Finally, if you want events to happen after the cutscene begins, you can script them using ACS. If you want these events to be triggered when the camera reaches a specific point, use Interpolation Specials. For example, you may want music to begin when the camera has reached a specific point. Set up an interpolation special at that point, then use it to trigger a script that starts the music.
4. Playing (testing): Once you've implemented the first three of the 4P steps, you'll need to test your work. In reality, however, you'll probably test the various pieces of your cutscene more-or-less continuously during the development phase. The key things you'll want to make sure of are the following:
Whenever possible, especially whenever the viewing of the the cut-scene is not necessary for the player's advancement within the game, provide the player a means to skip the cut-scene. Watching a cut-scene may be enjoyable the first time, but if a player goes back and plays the map again s/he may not be interested in sitting through it again. There are several ways by which you can allow a player to skip a cutscene. [However, keep in mind that some cutscenes may be required in order to move the action or story along, and it may not be desirable (or even possible) to make these portions skippable.] The method you use to allow players to skip cutscenes will, to some extent, depend on the type of cutscene:
2. Mission Briefings: Mission briefings pose a problem of being (generally) required the first time a game is played, but not necessary after that. One way to give the player the option of accepting the briefing or skipping it, is to create two "paths" before that point. The first path will go to the briefing, while the second path will by-pass it. If the briefing is at the beginning of the game, you can simply present the player with two switches - one for the briefing, one to skip it. If you wanted to make the choice more "realistic", you could have a corridor at the game start that leads to the briefing room (and a sign that says "Briefing Room" could be posted outside). The corridor could branch off at the door, continuing to the rest of the game, thereby not requiring the player to enter the briefing room.
Alternatively, if you wanted the mission briefing to begin automatically, you can silently teleport the player to a remote 64x64 sector after the camera has been activated. The wall that the player faces has an ACS trigger that, when "used", ends the briefing, teleports the player back to her/his original location, and changes the camera back to the players point of view (POV). In this way, the player can exit the briefing at will. [This same effect can be achieved by having the ACS trigger at the player's original location, but the risk is that the player may not activate the trigger during the briefing, but may inadvertently do so afterwards, resulting in unintended consequences. It is possible to nullify the trigger using ACS, and if you are comfortable enough with the use of variables, this method will work just as well for you.]
3. Other Cutscenes: The same method that works for skipping mission briefings after they have started will also work for other types of cutscenes. Simply provide the player with an ACS trigger that will terminate the cutscene and return the player to the game. (G)ZDooM allows even a totally frozen player to "use" switches, etc.
Mission briefings are generally the simplest types of cutscenes to develop. Let's look at the key blocks of code in an example. [Incidentally, this example is from Paranoid, a Half-Life mod for GZDooM.] The first picture below is the scene where the mission briefing occurs. You see the model of the briefer, the desk and other office accoutrements, and the two cameras. The second picture is from the map editor, and it shows the layout of the scene; the notes indicate what each thing is.


Now let's look at the scripting that went into creating the mission briefing:
//****
// Script 11: Mission Briefing & begin game
//****
script 11 (void)
{
Meanwhile, camera with thing identification (TID) of 255 has been set up as a moving camera at zheight = 152, is bilinear (camera will adjust its angle to match those of the points it passes), and will move to interpolation point with TID = 254. Interpolation point (IP) with TID = 254 has the same x, y, and z coordinates as the camera, is pointing to IP with TID = 253, and has a travel time of 64 tics to that IP, which is at zheight = 128 and slightly forward of the camera start point. This means that, upon being activated, the camera will slowly float down towards the floor before moving forward to the next IP.
SetHUDSize (640, 480, 1);
SetFont ("confont");
HUDMessage (s:"Dr. Bellmer, this mission briefing will serve to instruct you\non your primary and secondary objectives.";
HUDMSG_TYPEON | HUDMSG_LOG, 2, CR_GOLD, 30.1, 200.1, 0.5, 0.07, 1.0);
delay(const:35*8);
[Remainder of script, see below]
Meanwhile, the camera has moved to its "destination" IP. In this example, the IP is positioned at an actual camera model that the player can see as the POV approaches it. Again, this is simply a device to provide some realism, and is not required.
Admittedly, this is a rather involved mission briefing, and you can achieve the same result without the manipulations described here. However, this example illustrates the richness and diversity of effects that you can employ to create an attractive cutscene. The principles used in this example are virtually the same as those for other, more complex cutscenes. Even though you may use more actors, have more frequent camera changes, or implement more sound & light effects, the toolbox defined in the discussion above will allow you to execute a slick and professional-looking cutscene.
DooM editing is an incredible outlet for creative energy, limited only by your imagination. Here are a few things I've learned along the way; perhaps they'll be of some use to you.
1. Start small, but stay ambitious. Think of your first few levels as a training ground, where you learn the basics and become familiar with the tools. Beginners sometimes get carried away and bite off more than they can chew -- going for a 32-level megawad TC with new graphics, sounds, music, etc. is best left for a team, or for someone that's been around the editing block a few times.
2. Write down your ideas and draw out sections (or all) of your map. This will give you a sense of your scale. Avoid large areas or rooms, as they often give rise to visplane overflow (VPO) errors, which cause DooM to crash. Also, large areas that are plain tend to look ordinary and boring. Detailing large areas takes a lot of work, and can often lead to visplane errors when a source port is not used.
3. Add angles, recesses, and beams to your rooms so that they'll be visually interesting. Playing in square or rectangular rooms is all right, but adding these variations makes for a nicer looking map.
4. Incorporate height variations. Have a section of a map that is one or two levels up from the main level, and a section that is one or two levels down. Elevators and stairways make for interesting gameplay while providing a nice look and feel to a map.
5. Incorporate lighting variations. For outdoor areas in daylight and reasonably well-lit indoor areas use a light value of 160 and up, for indoor areas not under direct light use 128 to 144, for unlit corridors, etc. use light value of 96 to 128. Avoid excessive use of very dark areas, as it gets old after a while.
6. Use a balanced approach to gameplay. Always provide the player with a fair chance at finishing the level or an area. Sometimes you may want to make a particular area very tough, forcing a player to find an alternative way in or to get better weapons, etc. But make sure that the player has a way of beating the area, one way or another.
7. Pay attention to the general look of the level. Define a theme and generally stick to it. Try to use texture variations to provide visual relief to your areas. For example, use STARGR1 as the main texture in a room, but occasionally insert a STARGR2. If you have a plain wall that's more than 256 units long, add a wall-bracket or "support" that uses a different and contrasting texture -- e.g., STARGR1 as wall texture, METAL1 as support or pillar texture.
8. If it's consistent with your theme and level design, incorporate outdoor areas into your map. A good mix of indoor and outdoor areas lends appeal to a level.
Good luck.
 Spend some time reading the tutorials. You will learn the fundamentals, and, most importantly, the terminology. The two tutorials that helped me the most when I was getting started was The Unofficial Wad Designer's Handbook by Ron Allen and Bill McClendon.
 Experiment with enemies, traps, and gameplay. Use enemies selectively, as each has strengths and weaknesses. Not every enemy works in every situation. Make sure that you give your enemies enough room to move and maneuver. Putting a "wide" enemy in a narrow corridor causes them to be stuck to the walls, defenseless and unable to move or attack.
ZDooM (and its derivatives GZDooM & SkullTag) allows the creation of items that look and behave completely differently from those in "vanilla" DooM. These new items, known as "actors", need to be defined; this is accomplished via a text-based "lump" (name for any entry in a DooM wad) known as DECORATE. The purpose of this article is not to provide an introduction to defining custom items; rather, it highlights some lessons that I recently learned while creating my own custom items. For information on creating DECORATE definitions, refer to these sources:
New User's Guide to Editing with DECORATE
Creating Non-interactive Decorations
DooM World Forum Discussion on DECORATE
It turns out that many power-ups can't be carried from one map to another in a hub. For example if you want the player to pick up a radiation suit in one map and carry it for use in another map in the hub, the "standard" DooM radiation suit will not work. The item is activated as soon as you pick it up; but more importantly, as soon as you teleport into a new map you lose the power-up, even if there's plenty of time left on the item. In my opinion the biggest oversight in ZDooM's definitions in this regard, is the lack of portability of a computer map. You can pick up a computer map on one map in a hub and find that you've "lost" it when you travel to another map. [To be fair, however, when you return to the map in which you picked up the unit it is usable again.] So, in this section I will outline the steps to make a radiation suit that can be carried to, and used in, any map within a hub.
First, here's an example of a radiation suit that can be picked up in a map and put into an inventory for use in that or any other map in a hub.
So let's examine the definition above, which is virtually the same as the one for DooM's radiation suit:
Most DooM items are automatically activated as soon as you pick them up. This, of course, defeats the purpose of having an inventory in which you can store items for later use. In addition, some items change the player's state upon being picked up; the Berserk is an example of such an item. When you pick it up your health automatically maxes out at 100 HP, your weapon is lowered and your fist is readied, and your punches are given greater strength. You don't want these state changes to occur, but you want to be able to call them up when you're ready to use this item. So here's an example:
Inventory.Amount 100
Inventory.MaxAmount 200In an adventure scenario, and particularly within a hub, it may be necessary to prevent a player from using an inventory item prematurely. For example, let's say the player needs a radiation suit in Map05 of a hub in order to make progress through a nukage area, but the suit is available only in Map02. If the player picks the suit up in Map02 and accidentally uses it before getting to Map05, s/he is essentialy stuck in the game, as the nukage area cannot be traversed without the suit. So here's an example of how to set up the actor in such a manner that the suit (called a "special" SlimeSuit in this tutorial) cannot be used before reaching the nukage area:
Because it serves as a switch, Script 666 will look different in maps where SlimeSuit use is "denied" and in maps where it is "allowed". [As an aside, the script number is arbitrary. You can pick any number, so long as it's not already in use in all of the maps. A suitably high number (e.g., 999) would work just as well, as it's unlikely that a map has that many scripts - assuming they are consecutive.] First, a look at a map where SlimeSuit use is denied:
// Script 666: Prevents radiation suit from being used //
//////////////////////////////////////////////////////////////////////////////////
script 666 (void)
{
SetResultValue (0);
}
// Script 666: Prevents radiation suit from being used //
//////////////////////////////////////////////////////////////////////////////////
script 666 (void)}
}
This is a brief discussion on how to create maps in a hub structure within a ZDooM environment. A "hub" structure is a loose definition of the original "hub & spoke" structure. A hub & spoke design is one where there is a central map (the hub), and peripheral maps connected to the hub via spokes. [Very similar to a cart wheel, with the central hub being the point through which the entire structure connects.] A good example is the first Hexen mission. Subsequently, any collection of maps that allow players to return to maps already traversed (or allowed back-and-forth travel between maps) became known as hub-based wads.
There are two parts to creating a set of maps within a hub structure. The first part involves setting up your MAPINFO definitions, and the second part involves setting up your maps. (This discussion assumes you are familiar with the use of a MAPINFO lump.) To set up your MAPINFO, you'd need to assign your maps to a "cluster". [From the ZDooM wiki:] A cluster definition begins with the keyword “cluster”. For purposes of ZDoom, clusters are used to displays messages when moving between maps and to optionally group different levels into a hub.... When leaving a hub, the game will remember the contents of the level when the player left it and restore the level to that state when the player returns to it. The following is an example of a MAPINFO definition for maps in a hub:
map map11 "Power Plant"
sky1 sky1 0.0
music D_TENSE
cluster 1
map map12 "Krakatoa"
sky1 sky2 0.0
music D_ADRIAN
cluster 1
map map13 "Valhalla"
sky1 sky2 0.0
music D_ROMERO
cluster 1
map map14 "Temple of the Ancients"
sky1 sky2 0.0
music D_SHAWN
cluster 1
clusterdef 1
hub
This next section covers how to set up your maps. Assuming, for a moment, that you have a true hub-spoke wad in which the player starts in the hub map and can travel to 3 other maps, you'd do the following:
2. In Map01, you'd have exits to each of your other maps. For simplicity's sake, assume the player returns to Map01 at the same point that s/he leaves it. At each exit you would have a player start. For the exit/return point for Map02, you can assign an argument value of 1 to the player start (although you can just as easily assign an argument value of 2 or 3 if you wish). For the exit/return point for Maps03 and 04, you can assign an argument value of 2 and 3 to the respective player starts.
3. In Map01, your exit command would use Teleport_NewMap (map, position). So, to exit to Map02, you'd have Teleport_NewMap (2, position). For the sake of simplicity, assume the position (which is the player start argument value for the destination map) is 0. So your exit would be Teleport_NewMap (2, 0).
4. In Maps02 to 04, assign an argument value of 0 to the respective player starts. (You can assign a different value, depending on the argument you use in the exit command from Map01. See 3, above.)
5. In Maps02 to 04, create your exit points to return to Map01.
6. For Map02, your exit command would be Teleport_NewMap (1, 1); for Map03, it would be Teleport_NewMap (1, 2); and for Map04, it would be Teleport_NewMap (1, 3). The position values here correspond to the player start arguments you assigned in 2, above.
 So, let us not waste even more time and read on!
 Since almost ten years, I am an active mapper in the community and therefore I had the chance (or out of necessity) to use a large variety of different editors, like WinDeu, Deth, Zeth, WadAuthor and Zeth but none of them has been as advanced, as fast and as easy to learn as DoomBuilder and the all new DoomBuilder 2. The reason for this is definitely CodeImp, the creator of DoomBuilder. He is still actively working on improvements for his masterpiece mapeditor and what's even more important: He is working together with this on members from the community in terms of beta tests, bug tracking and feature suggestions. So, in a certain way, the new Doom Builder is a coproduction that aims exactly at the needs of us mappers. Additionally it's always up to date in terms of ZDoom/GZDoom compatibility (e.g. reading resources PK3s), and with it's countless possibilites and features, it's the primary choice for every Doom mapper out there. Nothing is better, nothing is faster, nothing is easier than Doombuilder. That's no hint, it's an assignment
  By the way, if you are more into next-generation-editing with all those nice dynamic lights and 3d models that GZDoom supports, you might also be interested in GZDoombuilder, a new fork that makes mapping even easer (thanks to UDMF btw).
 There have been several tools created over the years to work with Doom's data formats. DeuTex, WinTex, NWT, XWE, etc. The only one that is still maintained and that is updated to handle the new features of modern source ports is SLADE 3. Furthermore, it also features online documentation with a dedicated wiki. SLADE features a simple and intuitive interface, can open PK3 files, edit PNG offsets, and handle many data formats including those exclusive to some source ports or used by other games. SLADE 3 also supercedes SLumpEd entirely, having all the features of its predecessors but a lot less bugs.
 As of now, there is one single tool that can help you with all kinds of DECORATE needs that you could come up with. It's called DecX, standing for Decorate Extractor but in this case, that's only an understatement. DecX is a great decorate editor with all kinds of nifty features like syntax highlighting for actor and weapon codepointers, general decorate code and it is also capable of directly testing actors in a testing environment (weapons & monsters). For newbies, this is the perfect program to work and learn with. Unfortunately, it has some limitations. Nya didn't work on this for a long time now, so the syntax highlighting and possible codeointers isn't up to date and that's somehow a problem. The only way to avoid this, is Cutman Mike's latest application (yes, the man can do more than Ghouls
  ) DECORATE Assistant. The application simply pastes code for action functions and actor flags with the parameters ready to be changed, you only need to click on the system tray icon and choose the function you need and it appears in your editor or your clipboard if you prefer that. These two programs in combination and all your wishes are fulfilled. Sure, that's my personal preference and it's possible that other Doomers recommend other tools or even some more programs, but for me the ones that I've mentioned have been enough to create the Ultimate Torment & Torture, City of the Damned : Apocalypse and my ZPack submissions. So I think if you have these on your hd, most of the aspects you will encounter in mapping and modding for Doom will be covered.
Skill Level Required - Some computer knowledge is required, particularly as it relates to using a multi-function software program. Knowing the basics of geometric space is extremely helpful. Experience with computer drawing tools such as CAD is a plus, but not essential.
 Doom Builder by Pascal vd Heiden, aka Code Imp, is probably the foremost map editor in use by mappers today. It is currently in its second version, features a 3D editing mode, and incorporates support for all the major source ports as well as mapping in UDMF format. If you plan to work on maps for GZDoom or ZDoom, make sure to get the version called GZDoom Builder, developed and maintained by MaxED, as it features support for slopes, 3D floors, models, voxels, translucent lines, and all other GZDoom and UDMF features in 3D mode.
Purpose - To modify elements of your map besides the geometry. You may have played DooM maps where the graphic textures, enemies, sounds, music, weapons, etc. looked or sounded nothing like those in DooM. With a bit of practice, manipulating such elements can become quite routine.
Skill Level Required - Some computer knowledge is required, particularly as it relates to using a multi-function software program. Requires some understanding of the structure of a wad file (that's the file that contains all relevant information about your map or maps).
 DeepSea is a one-stop-shop for all your resource editing needs. (It is also a good map editor -- see under Map Editing, above.) While the map-making portion of DeepSea is shareware, the resource editing portions are not. Well-worth the download, although it has a fairly steep learning curve. The documentation and user support greatly help. For Windows.
Skill Level Required - Because of the relative simplicity of the tools available, not a great deal of computer savviness is needed. You will need to familiarize yourself with some new terminology, for which there is no substitute for reading the manual.
Available Tools - The most widely used tool for modifying in-game parameters is DeHacked, by Greg Lewis. It's been around for a while, and will run on DOS, Win95, Win98, and Win2K. (I haven't yet tried it on WinXP.)
Other Resources - Visit Nigel Rowand's Little Place of DooM for well-written and informative tutorials on DeHacked.
More Utilities Than You Can Shake a Stick At - Visit DooM World's Editors and Utilities Page for a long list of available tools.
 The Unofficial Wad Designer's Handbook by Ron Allen & Bill McClendon, is a well-written and easy to understand document. While it is not illustrated, the authors have provided links to examples that demonstrate what they're saying. This is another tutorial I used when I started DooM editing. It's classic, but it covers a lot of things that are still up to date and very interesting for newbie mappers - recommendation!
Standard doors (or those which do not feature remarkable linedefs and/or which are assigned a typical door texture) are for the most part used scarcely in Doom. Doors which require keys, lead to secret areas or are activated by shootable switches or walkover lines are to be considered exceptions to this generalization as they typically do little to disrupt the fluidity of gameplay. Doors serve more toward area segregation and combat control than as aesthetic dividers, and are used to grant the player easier navigation and time to either prepare or contemplate before entering the next room. As is often the case, this somewhat liberal use of doors allows the mapper to create a contrast in design between rooms separated by doorways, lending to some interesting shifts both visually and in terms of gameplay.
Here’s a selection of maps from each episode that we may use to illustrate door use, as well as a general overview on how doors are used between episodes:
Knee-deep in the Dead:
Of the three episodes, Knee-deep in the Dead uses regular doors the least. Most areas are separated by shifts in height or direction, which differs greatly from the slightly more uniform layout of maps in The Shores of Hell, and to a lesser extent Inferno. However, there is still a great deal that may be learned from the study of door use in E1. E1M3, 4 and 7, for example, all place the player in a room isolated from the rest of the level by a standard door.
E1M1
The first and only standard door (if we choose to exclude the exit for its being canon) allows the player to prepare before encountering the first monster in the game. It is expected that the player is still getting to grips with the controls of the game at this stage, and having a door here gives the player time to set his priorities and make the game move at his pace. Since M1 is a small and linear map, the function of the door could be seen as similar to those used in E3M1 for example, which is equally a one-way street. Doors cannot really obstruct the flow here as they are passed through only once (see M7 below for further examples).
E2M1, if we are to take the final M1 counterpart, is an also linear map which introduces teleporting to the player, and so the role of the door as a means of compartmentalizing and segregating areas is somewhat usurped, or at the very least expanded upon. E1M7
E1M7
At the opposite end of the episode is E1M7, which interestingly features only 3 standard doors of 17 in being perhaps the second most sophisticated level in the episode after M6.
The use of all three keys and a considerable amount of backtracking makes the use of doors particularly interesting. The lowermost door indicated [O] leads off to an optional area of the map which is not reachable via any other means, while the centremost door indicated [F] similarly leads off to a segregated area, but one to which a visit is deemed necessary for the player to complete the level. With the first example we might accept that the player will be unlikely to return to the southwest part of the map, and so the use of a door helps familiarise the player with the area beyond it through compartmentalization. Similarly with the second example, the centremost regular door (which stays open), the player is unlikely to visit the northwest portion any more than once, the red key having been obtained. Between these two doors however and elsewhere in the level the player is quite likely to revisit areas more than just once for both access and explorative purposes. The rising pillar, for example, gives the player access to the flanking slime pits in which multiple secrets reside, while the overlook closer to door F surveys these accessible areas.
The topmost door indicated [.B], just as with M3 and 4, allows the player a moment of collection, as well as a chance for the music to intimidate the player!
Other doors:
The Shores of Hell:
Doom’s second episode is where doors are first seen being used in drastically different ways, no doubt as a by-product of Petersen’s mapping style. Whereas Romero’s door deployment is more precise and controlling, Petersen’s is a great deal more haphazard, if not impossible to deduce. If you’re mapping for The Shores of Hell, you could probably get away with a great deal more in this department than you might in the first, and even in the third episode.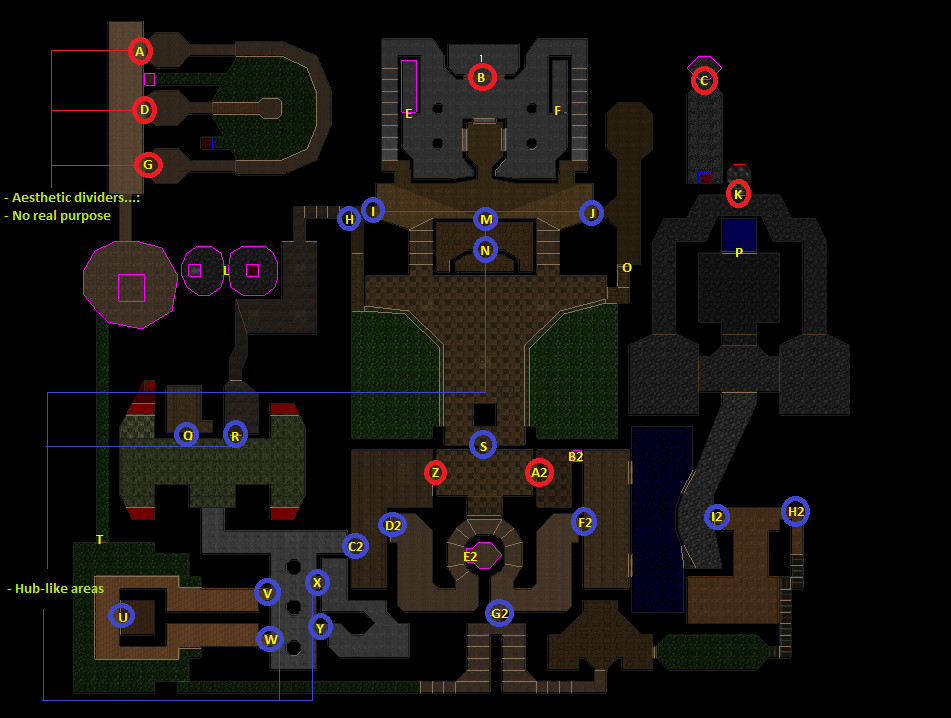 E2M5 & E2M6
These two maps, fortunately, have a very distinct procedure when it comes to door placement, in that they both feature very tightly framed doorways that branch off from a central passageway or area. The below diagram indicates, as before, the whereabouts of all the standard doors (those without remarkable linedefs and which are not secret related), but also the use of standard doors using a switch texture as indicated by the blue circle; a trend which is largely omitted in other maps of the game (E2M7, E3M3 and E3M5 sees some semblance of this style return, but it is here that the epitome resides!).
An astounding 35 doors in E2M5 sees the player drawing to a halt almost every couple of paces, and at first glance the whole setup can seem sort of chaotic. However, there is a great deal of order to the door arrangement here both stylistically and with relation to gameplay.
You will notice that a few of the doors lead to areas that, unlike E1M7, are not accessible only from one direction. Indeed, there are still many that do (such as with [M], [J], [Q], [A2] and [F2]), but there is a great deal of connectivity here, regardless of most entrance and exit points being located just feet from one another. Doors [A] and [G], [V] and [W], and [X] and [Y] all lead to looped pathways/areas, giving a stronger sense of perceived non-linearity, and many others such as [I] and [R] or [H2] and [I2] are linked via distinct, feature filled areas. A key thing to take note of here is that even the passageways are detailed. In addition, many of the blue circled doors (those which have a switch texture) branch off from hub-like areas.
With regards to gameplay, it is plausible to suggest that the doorways were used as a means to encourage the player to go exploring. While vast tracts of secret area are stowed away in the northwest of the map in a place which is everything but compartmentalized, there’s a great deal of goodies stashed behind closed doors.
Other doors:
Inferno:
For the most part, the use of doors as presented in E2 is replicated here, but a decrease in orthogonal design and an increase in abstract shaping sees substantially less intricate compartmentalizing of the sort seen in E2M5 and conversely more focus on the aesthetic - though not obstructive - and the experimental. Those who are mapping for E3 should seek to consolidate the flow retention seen in E1 with the more abstract or even gimmicky qualities of E3 maps such as Limbo’s gate system, Cathedral’s patterned layout, or Slough of Despair’s severed hand...
E3M1
As was mentioned with E1M1, E3M1 is a linear map that employs a many doors of which are passed under only once. There’s not an awful lot to say about this one except that it affirms an increase in standard door permissibility where linearity is descriptive of level progression. E3M5
E3M5
Unholy Cathedral has a monumental 38 doors in total, but pulls of the impressive feat of not having a single one of these standard doors interfere with the flow of gameplay. This is because they are not at all spread out, unlike in E2M5 or 6 for example, and are in fact grouped strictly with regards to map layout. Each group of four, central doorways links the corners of the map to the centre, and the player is able to deduce extremely quickly because of the remarkable structure of the map just where all the doors will lead, and how to navigate from one corner of the map to the other. In an instant, almost all of the doors in the map are less an obstruction and more an indicator of where to go. It is the perfect example of how best to combine symmetry with door usage while still giving the impression of having ample space to run around in and a clear sense of location and baring.
Also important to note are the first 4 doors in the map which allude to the maps structure and means of progression before the player has even made a move. After passing through one doorway and observing the way in which the map curls around the centre, the player, just as before, is able to develop an idea of where those other doors might lead.
Other doors:
Summary
It might seem a trivial subcategory to go under Layout and Structure, but there’s a considerable difference between how lifts are used in most modern maps and how lifts are used in id’s. In Doom’s case, most lifts are not used for rescuing players from slime pits, for instance, or for entirely separating areas such as is the case with doors. Instead, they function as dividers within an area, as an atmospheric piece, or again as a means to control the flow of combat. Crucially with regards to this last point, the speed at which they rise or lower can make them a unique tool for forcing a player’s stay in a combat scenario, whereas a door might allow an easier escape. Lifts, like standard doors, are not all that common in Doom.
Let’s take a look at a few of the ways in which lifts are used in Doom, to what effect, and in what ways they might be exclusive to each episode. If at all.
The Raised Platform:
This is a basic technique which is commonly used in Doom, and especially in the first episode. Simply put, it is a lift that doesn’t lower or raise the player into an area that is out of sight when viewed from the top/bottom. While all lifts in Doom are technically “raised platforms”, this name is meant to signify the fact that many lifts do not really separate different areas, and can be seen more as a means to get from one part of an area to another (If we are to pinpoint what exactly is meant by “area” in this case, we can suppose that it is in most instances the movement from one distinct location to another via a sort of geometric standard in connectivity - doors, teleporters, connecting lifts, hallways/tunnels etc.), often accompanied by a shift in visual style. In episode 1 they will often take the player to a ledge, doorway or dead-end rather than leading them to another part of the base.
Here are a few examples of the raised platform type as seen in Doom. Please skip to the summary of this chapter to view some of the discrepancies in lift use between episodes:

Example #1
At the top of both lifts featured near the starting area of E1M2 is a ledge. The ledges themselves cannot really be considered a separate area, and although the area surrounding the lifts at the lowest point is probably too small to be considered an area either, the lift does not raise the player into a area which could not be seen by the player prior to being stepped onto.
Example #2
Again in E1M5 and 6, we see more raised platforms. However, both of these lead immediately to doors rather than ledges, though all 4 examples showed so far lead to places that are incredibly small by themselves. If we are to count in such examples as the lift next to the secret exit of E1M3, the chaingun secret in E1M3, the blue L shaped ledge reached from the lift in E1M4 and the yellow key area of E1M7 (as well as behind the yellow doors), we begin to see how, as previously mentioned, many if not the majority of lifts in episode 1 take the player into some sort of cul-de-sac or doorway.

Example #3
E2M4 is one of the few maps in episode 2 that actually features lifts, so when we are discussing how they are used between episodes it’s worth keeping in mind that if they are to be used at all, this is probably the best map from which to draw principle. The raised platform lowering into the circular pit here is similar in a way to the non-raised platform - or closed lift - that is used at the end of E1M2 (see below). In this case, a switch needs to be pressed in order to lower the lift, and its functioning as both an atmospheric piece and as a way to prevent the player from escaping quickly the many Barons and Cacodemons is affirmed (note too the spinal texturing).
All the lifts in this map are raised platforms, and two of them lead into symmetrical areas. It is similar to Petersen's E1M8 in that the room of symmetry is aligned with a lift, but different in that one lift is "closed" and the other is not, a point which could either show the triviality of differences between the proposed lift types or the further tension gained by sealing the player from view of the Baron's lair.
The Closed Lift:
There certainly aren’t many lifts of this sort. Unlike the raised platform, the closed lift is encased by wall from all sides bar the point of entry (prior to being stepped onto). It blocks the player from view of its destination, which can be incredibly useful in such circumstances as the aforementioned E1M8 or E1M2, as shown below, where the mapper intends to surprise or bewilder the player as they are struck by new surroundings. Closed lifts are perhaps the best example of how lifts may be used to separate areas in a similar way that many doors do, and so to that end whether or not the player uses it is a matter less to do with blocking the player's view but maintaining a sense of diversity in tight spaces.
Example #1
E1M2’s descending lift toward the end of the map is perhaps the best known example of this lift type. It forces the player into a somewhat difficult situation, and intends to prevent him from escaping without at least some damage being sustained or the opposition killed. It is also accompanied by a sudden albeit analogous shift in lighting. In other words, it is intended to push the player into harms way. It may also be worth noting the introduction of remote switches as a means to open doors (disregarding the earlier secrets), which is again similar to E2M4's own introduction for lowering lifts remotely. In both circumstances the player is required to work out how to escape the sudden ambush should they opt against killing everything off. Example #2
E3M3’s closed lift has no monsters waiting at the bottom. Nor does it have any real shift in lighting or effect. It simply stands to segregate the areas in their style. The dual stairwells that branch from the symmetrical wooden area close to the start represent a similar shift, but if we are to consider the geometry here we might also suppose that the lift was opted for to conserve space and retain variety: something this map does particularly well on the whole. Again, it’s use is somewhat experimental, and it lends the purpose of the closed lift to the mapper’s discretion, if not at all proving it to be hopelessly negligible.
The Doorlift:
Exclusive to E3M1, the mighty doorlift is as its name implies: a door that lowers as a lift rather than raises as a door. It is difficult to provide any explanation as to why this trick is performed other than to say that it was probably intended to freak out the player a little bit. “Now you’re really in Hell!” sort of thing.
Summary
Doors and lifts exist. This much is true. But because teleporters don’t yet exist, were relatively new inclusions to the virtual gaming world on account of its being so young, and because Doom is a game of emersion, how teleporters are presented even before the considering of their use with regard to layout and structure is critical to their implementation. This chapter covers both how they are presented and how they allow the player alternative (or necessary) means of navigation. The two never seem to correlate, but they are of equal importance. Episodic Differences
With only two of the three teleporters featured in Knee-Deep in the Dead being usable by the player, and only one of those two taking the player to a location that won’t see him torn to tasty strips in a matter of seconds, it might seem at first reasonable to say that the role of teleportation in episode 1 is negligible. Quite to the contrary however, the inclusion of teleporters in episode 1 is of great importance because of its being central to the story of the game. Having a teleporter feature in a secret area of Phobos Labs demonstrates clearly the intended experimental nature of teleportation in this episode, as does perhaps the red cobble texture for representing the “red dust” over which the anomalies were built; so explained in the Doom Bible. Clearly its use here is aesthetic and does not in any drastic way alter gameplay or change the means by which one might realistically navigate the map, but it remains relevant to the story, and in that sense necessary to making any mock Knee-Deep in the Dead episode a complete one; provided an identical storyline.
With The Shores of Hell and Inferno episodes teleporters are used primarily as gameplay devices central to map layout and navigation. Between both of these episodes little difference can be seen, but there are a couple of things worth mentioning. Much like the lifts in episode 3 being used more experimentally, teleporters here seem almost to transcend any set of rules that they should follow with regard to their appearance (see below). Presumably, this is because the laws of reality in Hell are suspended, and teleportation is a slightly less remarkable or perhaps even naturally occurring phenomenon that merely requires a lesser means of establishment (a plain texture). Consider, for instance, the Demon in E3M6 that teleports just a few feet upon sighting the player in the wooden building to the east.
Episode 3 teleporters are often one-way, in addition, and in E3M6 will typically take the player to a destination which is visually bare of teleport markings. We could claim this to be something unique to an outdoor setting in Hell or as a result of an increase in teleport permissibility due to there being a Hell, or we could simply put it down to preference and allow unremarkable teleport destinations to occur in any episode 3 environment.
Finally, episode 2 teleporters often give the impression - through the various shifts in design that the 3rd episode often lacks - of being either manmade or demon made (again, see below under “appearances”). This strengthens the concept of the Deimos base undergoing demonic subversion. The Dumbbell Complex
Now then. Call me an inadequate wordsmith, but it’s true what they say about pictures. Here’s one of them now!
Harmless looking enough, isn‘t it? But just in case you don’t yet have a strong enough idea of how teleporters are used (turbo pun!), or haven’t quite gotten to grips with how they are presented, here’s a pretty handy analogy for you to memorize:
Teleporters in Doom are never used trivially except in the sole case of E1M5 - for reasons I hope have been made clear enough. Episodes 2 and 3 really focus on using them primarily as integral gameplay elements, but that isn’t to say that they completely disregard their impressive implications. Remember that the idea of teleportation was a great deal more popular in the 90’s in the realm of science fiction, hence its inclusion, and to have the player merely teleported from one side of a room to another - for however practical a reason - wasn’t doing it justice.
You really had to go places.
Where does the dumbbell come in then? If we assume that each weight on a dumbbell is representing an entirely separate area in a Doom map, and that the handle between the two weights is the line of teleportation, then we can apply this image to every single use of teleportation in the entire game and find that both the point of departure and the destination lie in separate areas and that the analogy holds true - with just one exception (that exception being E3M5. We can call this a “Waffleport” or a piece of Swiss Cheese if you prefer. I’ll let you figure out why). Obviously this is a super typical use of teleporters and isn’t anything at all unique to the stock maps, but it needs mentioning because of how the respective areas are designed aesthetically with relevance to this original “idea” of teleportation. In exaggeration it would be the difference between teleporting from the Himalayas to the Amazon in one instance and a living room to a lounge room in another. There are, interestingly, many ways in which we can show this without the need for silly dumbbell analogies, although it would require digging into far less objective grounds...:
First Impressions
What do you want the player of your map to see when they arrive at the other side of your teleporter? Reminding ourselves of the “closed” lift type which encourages a greater shift in atmosphere or pace of play due to a sudden revealing of information (E1M8; E1M2), the teleporter will unfailingly thrust the player into a new bearing. It’s what the player sees first off that causes me to draw this comparison with the closed lift, as this can promote a greater sense of shift in an area even if it is otherwise pretty similar. Case in point is this teleporter in E3M5. Instantly your movement stops. You click into a different mode. You can’t just barrel through these idle Demons without getting munched on. Note however that the room is otherwise fairly ordinary. More ideally the shift in geometry would be pretty considerable, but this is an effective way to take good advantage of the sudden shift while keeping consistent with the Doom design. Put something of value to see right at the immediate, and to be even more effective make it more than just visual impact. If you can change the player’s train of thought or pace of play, you’ve bagged yourself a real winner.
Other examples include E2M1’s Demon ledge, E2M5’s Lost Soul surround (secret), and E2M4’s scrolling face texture (note that this texture had not been used up until this point). Appearance
The appearance of the Doom teleporter is an important one, and not something that is restricted to mere texture selection. Geometry is vitally important, and it’s evident that the game designers were interested in having teleporters thought of not simply as a set of linedefs for the player to step over but as physical world objects / setups - like doors and lifts. Episode 1’s teleporters are obvious examples of this with their five point stars (the scientists behind them possibly (un)intentionally emulating a necessary demonic design), but let’s look at some of the latter cases:
E2M1’s first teleporter is an immediate departure from those couple seen in the first episode, but not just in its size, shape and texture. There are candle decorations surrounding it for starters, giving the air of a ritual having taken place, and there is a mock star shaped step as well, which could easily mean to be a makeshift mound of some sort; something the demons might have placed in hurried preparation. E2M7’s teleporter is almost gate-like in its appearance, and is similar to the previous example in that it too appears makeshift, what with the tunnel branching off from an insignificant looking vat, as though it had been bored out in secret.
As mentioned, Episode 3 forgoes some of these design principles and opts for just having a plain teleporter texture with no real geometric feature. Admittedly E2M1 does this as well with the exception of the first, but when we consider the connection between teleportation and anomalies as presented in the Doom universe we can make sense of the fact that again, as mentioned, Hell and teleportation are fairly synonymous. The visuals can be downplayed.
Summary
This tutorial provides step-by-step instructions for creating sprites for ZDooM or GZDooM from models. You can use essentially the same steps to create sprites for vanilla DooM/2 or or for other source ports, but you may need to use a different file format than the one primarily covered in this tutorial (i.e., png format), which could result in reduced resolutions and additional steps. This tutorial does not cover every possible way of undertaking such a task; rather it provides one possible way that I have found to be reasonably effecive. For this tutorial I will provide an example for Barney (the security guard) from Half-Life.
Section A. Extracting Models and Capturing Images
1. Browse the installed version of Half-Life on your hard drive. Typically, the path will be:
C:\SIERRA\Half-Life\valve\models\player\barney
2. Select the file 'barney.mdl' and copy it to the folder of your choice (e.g., C:\DooM\HLDooM\Sprites)
3. Use a utility such as Half-Life Model Viewer (the newest version appears to be Jed's HLMV 1.3.5) to open barney.mdl. The rest of the instructions in this section are based on this utility.
4. From the Sequences tab use the drop down menu in Animation Sequence, and select the model's first position. In this case I have selected 'deep idle'. [The default is walk, and the model will be animated. Use the Stop button at the bottom to stop the animation.]
5. From the menu select 'take screenshot'. An image in .tga format will be saved to the same folder in which your barney.mdl file resides
6. Click on the model and move your cursor to the left. When you have positioned the model in your next position, take another screenshot. I moved the model to the position of a "quarter turn". In other words, if the start position represents the hour hand at 6 o' clock on an analog timepiece, the quarter turn to the left represents the hour hand at 7:30.
7. Repeat Step 6 until you have taken a total of eight screenshots. [Note that you can move the model an eighth of a turn, so that you wll have a total of 16 screenshots. This will give you a "smoother" rendered animation, but also requires a great deal more work (especially if you want animations for idle, walk, run, attack, and death sequences) and will take much more disk space.]
8. Select the model's second position. In this case I have selected "walk".
9. Repeat Steps 5 through 7 for the first set of walking animation screenshots.
10. Using the arrow (Speed) buttons in the Sequences tab, advance the frames to the next desired position of your model's walking animation and take a screenshot. In this case I advanced the position until the model's rear leg had moved to be level with the fore leg. In other words, this is the mid-position of the model's stride. Again, I selected this mid-position for economy of work and frames. You have the option of five additional positions between the start of the walk sequence and the mid-stride.
11. Use your cursor to move the model to your left until you have reached the desired position, and take a screenshot. If you are using 8 frames for the 360 degree rotation of your idle sprite, I suggest you continue to use 8 frames for each of the remaining positions of your sprites' various animations.
12. Repeat Step 11 until you have taken a total of eight screenshots.
13. Repeat Step 10 until the rear leg (now the fore leg) has reached its forward-most position, and take a screenshot.
14. Repeat Steps 11 through 12 for the second set of walking animation screenshots.
15. Advance the model's walking frames to the next mid-stride and repeat Steps 11 through 13 for the third set of walking animation screenshots. At this point you are done with capturing frames for the walking animation.
16. Select the model's next position (e.g., run, shoot, death, etc.) and repeat Steps 5 through 15 as necessary to capture a complete set of animation frames for that position.
17. Repeat Steps 5 through 16 for as many positions as you desire. When you have a complete set of sprites for your character move to the steps in Section B, below.
Section B. Converting Captured Images
1. Use a utility that will allow you to convert your images from .tga (TARGA or Truevision Advanced Raster Graphics Adapter) format to .bmp (bitmap) or .png (portable network graphics) format. I have identified these two formats as they are both supported in ZDooM and GZDooM. My preference is to use .png format, because the final file size is considerably smaller than that of a comparable .bmp file. Moreover, .png format images retain their color pallettes, so even though each image may only have a finite set of colors, several images will collectively have a far greater range of colors. To convert and modify images from .tga to .png format I use a simple but effective utility known as XnView. It is available for free, and I believe the latest version is v1.90.2. The rest of the instructions in this section are based on this utility.
2. Use the browser in XnView to find the .tga images that you created in Section A, above.
3. Select the first image and double-click on the image to open it up in a new tab within XnView. In my case the first image was barney01.tga.
4. From the menu bar select File\Export. This will open an Export window from which you can make your format selection.
5. Select the PNG tab, in the color mode select 256 Colours (Adaptive), and select Set Transparency Colour ... [Notes: I have recommended 256 colors for file size considerations. If you choose the default of 16 million colors you will get a large file, and I'm not even sure that ZDooM or GZDooM will actually render the image in all its colors. You must select Set Transparency Colour ... in order to assign a transparency property to the background of your image. If you do not, the character sprite will be displayed in-game with a colored, rectangular "box" around it. The defaults for the other options are: no interlacing, compression level 7, and no filtering. I have chosen to stay with these defaults.]
6. An "Edit Colormap" window pops up. Find the cell with the color that matches your background color. In my case the color is RGB 68,130,132, and if you started with barney.mdl you will likely have this color too. Select this color, and the Index number along with the RGB values are displayed in grey text on the right of the window. Note that the Index value for this "transparency" color may change from image to image. In other words, the cell with that color may not be in the same position from one image to the next.
7. Select the "Enable Transparency" box. This step is essential, so do not forget to check the box. Click OK, and you will be returned to the Export window. If you compare the file sizes, you will see that there is a HUGE reduction in file size (without a corresponding reduction in image quality). For example, my .tga file is 666.04 kB while my .png image is only 12.89 kB.
8. Press the 'Save' button and you will be prompted for a file name. The default is the original file name with a .png extension. Change your file name if you wish, then press 'Save' again. You have successfuly converted your original .tga format image to a much smaller .png image. [Note: I recommend that you limit your file name to 8 characters, as wad editors such as XWE (and DooM in general, I believe) only recognize the first 8 characters of a lump's name. So, if you have two files named BarneyIdle01.png and BarneyIdle02.png, the second image will be ignored because there already is a lump with the name BarneyId.png.]
9. Repeat Steps 3 through 8 for your remaining images.
Section C. Modifying Captured Images
1. You will notice that the "transparent" area of the image is much wider and taller than you need for a sprite. You will need to crop the image to a more reasonable size. Again, I have used XnView to do the job, but I imagine that other image editors will work just as well. [Note: I have tried to crop the image using MS Paint, and for some reason the transparency property seems to disappear upon saving the modified image. For this reason I recommend not using MS Paint for this task.]
2. In XnView, use the browser tab to find your first .png image. I have found that XnView often does not refresh the browser, so that files you have converted from .tga to .png format in Section B, above, may not be displayed. To rectify this, simply select View\Refresh from the tool bar, and the converted images will appear. Double-click on your first .png image, which will open in a new tab.
3. Use the ZooM tool in the tool bar to make your image larger. I typically click the button twice to bring the image to a reasonable size.
4. Click your cursor on some part of the "transparent" section, not too far wide or high from the character image. Drag your cursor so that you have a box around your character. Don't worry if you fall short or go too far; the program allows you to modify your box. Drag and drop the edges of the box until you have a one-pixel margin around the top, bottom, left, and right edges of your character.
5. From the tool bar select Edit\Crop. Your image will be cropped to the dimensions you indicated by your box.
6. From the tool bar either select File\Save or File\Save As, or click on the Save As icon. Depending on your selection you will either be told that a file with the same name exists and aked if you want to overwrite it, or will be prompted for a file name. Make the appropriate responses, and you will have successfully modified your image to be more suitable for use in DooM.
7. Repeat Steps 2 through 6 for your other images.
8. At this stage you can opt to resize your images. Resizing is different from cropping in that the latter simply removes unwanted areas of your image, whereas resizing enlarges or shrinks the entire image. To resize, use the browser in XnView to find and select your image, double click on it, and select Image\Resize from the tool bar. A Resize window pops up, from which you can make your desired enlargement or reduction. You can either manually enter the Screen Size width and height, or use the Standard Size drop-down menu to select the desired size or percentage. Select OK, which will result in your image being resized, and save the file. [Important Note: Because of the daunting dimensions of the images you get at the end of Step 7, you may be tempted to shrink your images for use in DooM. Doing so will result in a loss of resolution, without significant benefits if you are going to use ZDooM or GZDooM. First off, there is no change in the file size (as a matter of fact, my file size increased factionally with a 50% reduction in size. Second, with the Scale feature in (G)ZDooM you can scale the sprite down in-game without any loss of resolution. Accordingly, I recommend that you do not shrink your images in a graphics editor.]
Section D. Inserting Sprites Into a Wad
Now while most DooM editing folks are quite familiar with how to insert sprites into a wad, the insertion of png images as sprites may not be quite as intuitive. As such, I have outlined a few steps that will allow you to insert your png sprites into a wad with the least amount of effort. I will illustrate this section through the use of XWE, a free DooM editing utility, although DeepSea and other utilities will be more than adequate for this task. Make sure you are using the latest version of XWE (currently a Beta version, available at XWE Beta Downloads), as v1.16 does not support png transparency, automatic sprite offsets for png images, etc.
1. To allow XWE to automatically offset your sprites you should rename them using the common DooM nomenclature before importing them into your wad. For example, I named the idle Barney sprites BARNA1-BARNA8, the first set of walking sprites BARNB1-BARNB8, the second set BARNC1-BARNC8, and so on until the final set of walking sprites as BARNE1-BARNE8.
2. Open XWE and select the wad into which you wish to insert your sprites. If you wish to create a new wad, simply select File\New from the menu bar.
3. Select View\Options from the menu bar, and an Options window will pop up. Go to the Special tab, and make sure the Always Load PNG Files as Raw Data box is checked off (I believe this is the default, but make sure). Select OK to exit the Options window.
4. At the bottom of the screen is a Filter Tool Bar, in which one of the selections is Sprites. Double-click on this selection, and a browser window pops up. Navigate to the appropriate folder, and select the sprites you want imported. Make multiple selections if you wish, as this will save time to load the images into the wad. Press the Open button, and XWE will properly import your png images, put them between the appropriate SS_START and SS_END markers, offset the sprites, and assign transparency. You have successfuly imported your sprites into your wad.
Section E. Animating Your Sprites
Animating your sprites will require the use of DECORATE in ZDooM or GZDooM. As this discussion is not meant to be a tutorial on the use of DECORATE, I will not go into the different variables, but will focus on a few key aspects. If you wish to create your character definition from scratch, feel free to do so. I have chosen to start with an existing definition for a DooM 'actor' that most closely resembles the Barney character - the ZombieMan (basic Trooper). You can start with pretty much any DooM enemy, but as both Barney and the ZombieMan are human (at least in origin), it makes sense to model the former after the latter. Stock definitions for all DooM enemies may be found in the ZDooM wiki or at mancubus.net.
1. Open up a text file in MS Notepad, and name it DECORATE.txt. Copy the relevant actor definition from one of the sources listed above into this text file.
2. The first (non-comment) line will be: actor ZombieMan 3004. The name 'ZombieMan' is a unique identifier of the actor, and already exists. Therefore, you must change this name to something that has not already been defined (i.e., for this and other 'actors'). I chose Barney, but you can use a different name. The value '3004' represents a unique thing ID number, and this too already exists. Change this to a number that has not already been defined. I chose 20119.
3. The next variable you see will be: spawnid 4. This represents the value for the actor that you will use to spawn it in-game, typically via a script. You will need to assign a different number (unless you want a ZombieMan to be spawned whenever you call up Barney); I have chosen 209.
4. Feel free to experiment with the other properties, but at this point they are not as important (in my opinion) as one that is not yet in the definition, namely 'scale'. Converting from a model to sprites typically results in very large images. Unless you wish to actually use large sprites, you will need to scale them down. Insert a line that reads: scale 0.17 somewhere in the definition before the line that reads: states. I find that the Barney sprites are scaled down to the right size with the value 0.17 (17% smaller than the original), but you may wish to try slightly different values.
5. The first line in the Spawn state of the stock definition reads: POSS AB 10 A_Look. Rename it from POSS to the first four letters of your sprite's name. In my case it is BARN. The next two variables in the definition are AB, which represent the two sets of 'standing-walking' animations for the ZombieMan. In my case there is only one set of standing frames (namely BARNA1-BARNA8), and I do not want Barney to appear as if he is walking in place, so I replace AB simply with A. My new definition, therefore, becomes: BARN A 10 A_Look.
6. The first line in the See state reads: POSS AABBCCDD 4 A_Chase, which represents the walking animations. Rename POSS to BARN, and insert the appropriate frame letters that represent the complete walking sequence. In my case, they are BBCCDDEE. My new definition, therefore, becomes: BARN BBCCDDEE 4 A_Chase.
7. Following the guidelines in Steps 5-6, above, go down the list of States, and replace the stock definitions with those specific to your sprites.
8. Use XWE to insert the DECORATE file into your wad. You have succesfully completed animating your sprites.
End of lesson.

